
If you've ever landed your shin on someone’s elbow—or worse, taken a hard kick with no conditioning—you know the pain that lingers for days. Shin conditioning is a rite of passage in Muay Thai. It’s not just about building pain tolerance—it’s about building weapon-grade legs that can throw, check, and eat kicks without flinching.
But before you go banging your legs against trees or rolling them with glass bottles (please don’t), let’s talk about safe, smart, and effective drills to condition your shins the right way.
Whether you're just getting started or trying to toughen up for your next fight, this guide breaks down the best ways to build Muay Thai-proof shins—without breaking them in the process.
Why Shin Conditioning Matters in Muay Thai
Shin conditioning isn’t about being a tough guy. It’s about function.
You use your shins to:
-
Throw kicks
-
Block kicks
-
Clinch and sweep
-
Check and counter
A well-conditioned shin helps you:
-
Land kicks without hesitation
-
Defend confidently
-
Reduce bruising and inflammation
-
Stay in the fight longer
And guess what? You don’t need to be born with iron legs—you can build them.
How Shin Conditioning Actually Works
Let’s bust a myth real quick: you’re not killing nerves or “deadening” your shins when you condition them.
What’s really happening is:
-
Microfractures occur in the bone (controlled and small)
-
The body repairs and reinforces the area with denser tissue
-
Over time, your shins become harder, tougher, and more resilient
You’re also:
-
Training your brain to respond calmly to contact
-
Building tissue tolerance in your skin and muscles
-
Developing a fighter’s pain threshold (yes, that’s a real thing)
But all of this only happens if you condition gradually. Go too hard, too fast? Say hello to injury.

The 7 Best Drills for Shin Conditioning
1. Heavy Bag Kicks
This is the king of shin drills. Simple, effective, and part of your regular training anyway.
How to do it:
-
Kick a firm heavy bag (not a soft or loose one)
-
Start with 20 kicks per leg, gradually increasing over time
-
Focus on technique first, then build speed and power
Why it works: You’re hitting a solid surface that mimics impact while reinforcing good striking mechanics. Consistency is key—do this 3–4 times per week.
Pro tip: The Fairtex Banana Bag is perfect for this drill—long, firm, and made for power kicking.
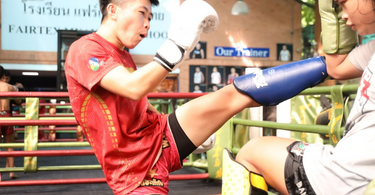
2. Pad Work with Low Kick Focus
Pad work lets you go full power while still learning control, angles, and follow-up strikes.
How to do it:
-
Ask your pad holder to hold low kick pads or Thai pads at leg level
-
Drill 10–15 low kicks per side, per round
-
Work variations: single kicks, doubles, checks followed by kicks
Bonus: Have them return fire occasionally to help you practice checking too.
3. Sparring with Low Kick Exchanges
Live work is where shin conditioning really sets in. Sparring introduces real contact, timing, and pressure.
Tips:
-
Start light and controlled—this is not a kick war
-
Focus on landing clean, checking properly, and reading your opponent
-
Wear shin guards (especially early on), but don’t avoid contact
Over time, you’ll notice your tolerance increase—and your flinching decrease.
4. Shin on Shin Drills
One of the most realistic drills is checking and returning kicks, shin-to-shin—but it must be done with supervision and awareness.
How to do it:
-
Partner throws a light low kick
-
You check properly (shin pointed outward, toes up)
-
Alternate roles for a few rounds
Important: This drill is about building comfort—not pain. Use shin guards if needed, and stay light until both fighters are conditioned.
5. Wall Taps or Pole Conditioning
This old-school method still works—if done correctly.
How to do it:
-
Find a padded pole or thick punching bag hung vertically
-
Lightly tap your shins against it, alternating sides
-
Do 3 sets of 20 reps, focusing on steady rhythm and light contact
It’s not about smashing—it's about stimulating the bone and tissue over time.
6. Ice Baths and Recovery Routines
This isn’t a drill, but it’s essential for long-term progress.
Shin conditioning = inflammation, so you’ll need to manage soreness with:
-
Cold plunges or ice baths
-
Compression sleeves
-
Topical magnesium
-
Light massage and stretching
Skip recovery, and you’ll burn out fast. Stay ahead of the bruising, and your body will adapt.
7. Shadowboxing with Shin Focus
You can even condition your shins during no-contact drills.
In shadowboxing:
-
Visualize the kick landing
-
Fully extend and re-chamber your leg
-
Snap with speed, practicing perfect technique
This builds the neuromuscular coordination to throw clean, accurate kicks that land on bone—not elbows or knees
Drills to Avoid
Don’t fall into these traps:
Bottle rolling or glass rod smashing
These damage tissue, nerves, and can permanently mess with your legs.
Kicking metal poles or trees
You’re not a character in an old-school fight movie. There’s no bonus for self-injury.
Over-conditioning
If your legs are constantly bruised, sore, or swollen, you’re overdoing it. Back off and let your body heal.
How Long Does Shin Conditioning Take?
There’s no one-size-fits-all answer, but most fighters notice improvement after:
-
2–3 weeks of consistent bag work
-
4–6 weeks of controlled sparring and drills
-
3–6 months for full adaptation, depending on training frequency
It’s about building long-term durability, not short-term pain tolerance.
Stay consistent, recover properly, and trust the process.
Final Thoughts: Shin Conditioning Is a Journey
Your shins are a weapon. But like any weapon, they need tempering, care, and proper training to be effective.
Conditioning isn’t a one-time event—it’s a habit. A slow burn that transforms you from hesitant kicker to confident destroyer.
So grab your gear, hit the bag, and start toughening up the smart way.
Need Shin Guards, Bags, or Conditioning Tools?
From firm heavy bags to fighter-trusted shin guards, MuayThaiRoots.com has everything you need to build unbreakable legs and kick with confidence.
Shop Muay Thai Shin Gear Now
Train smart. Kick harder. Condition like a fighter.